Introduction
Companies who have the most success adopting MEDDIC all do one thing really well.
They integrate MEDDIC into their daily processes.
In these companies, MEDDIC is not just a qualification tool, but the language in which the sales team talks about their deals.
As such, MEDDIC needs to live where the Sales team lives, which is most often in Salesforce.
The steps below outline how to configure a MEDDIC Traffic Light system inside Salesforce!
Step 1 – Download Resources
There are two files that are required for this exercise:
- MEDDIC_ALL.ZIP – This is a zip folder that contains all the MEDDIC images that you will be uploading to Salesforce.
- MEDDIC Traffic Light Definitions – This document can be used for internal training and education.
(ensure pop-ups are enabled for this site)
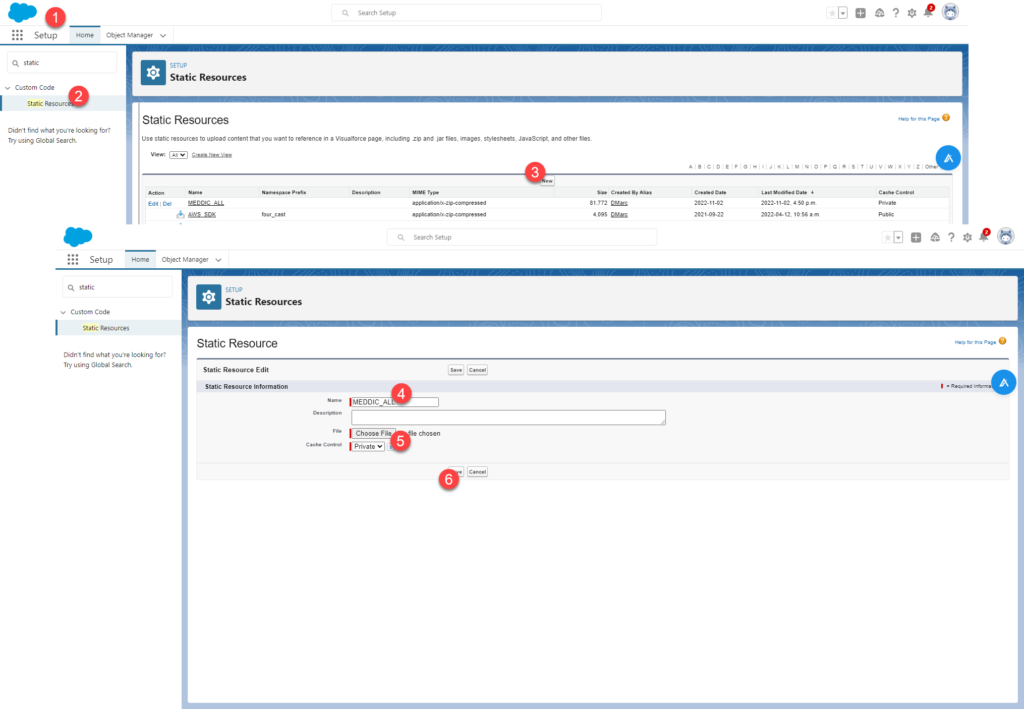
Step 2 – Upload Images as Static Resources
- Navigate to Setup
- Search for Static Resources
- Click New
- Enter name as MEDDIC_ALL (it is important to end the name exactly as shown)
- Select Choose File, and upload the file downloaded from the first step step.
- Click Save
Step 3 – Get Static Resource Path
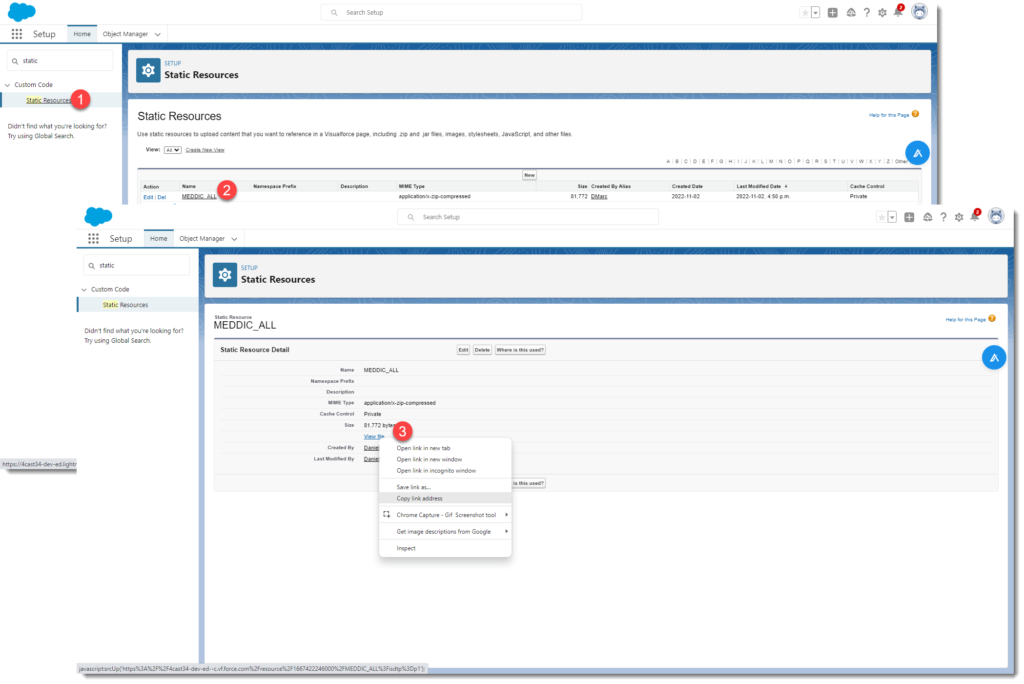
- From Setup, Navigate to Static Resources
- Click into the MEDDIC_ALL record
- Right Click where it says View File and choose Copy Link Address (note that this step might be slightly different depending on your browser).
- Paste the URL on a notepad as we’ll need it later. The URL should look something like this:
https://4cast34-dev-ed–c.vf.force.com/resource/1667422246000/MEDDIC_ALL?
Step 4 – Create Global Picklist
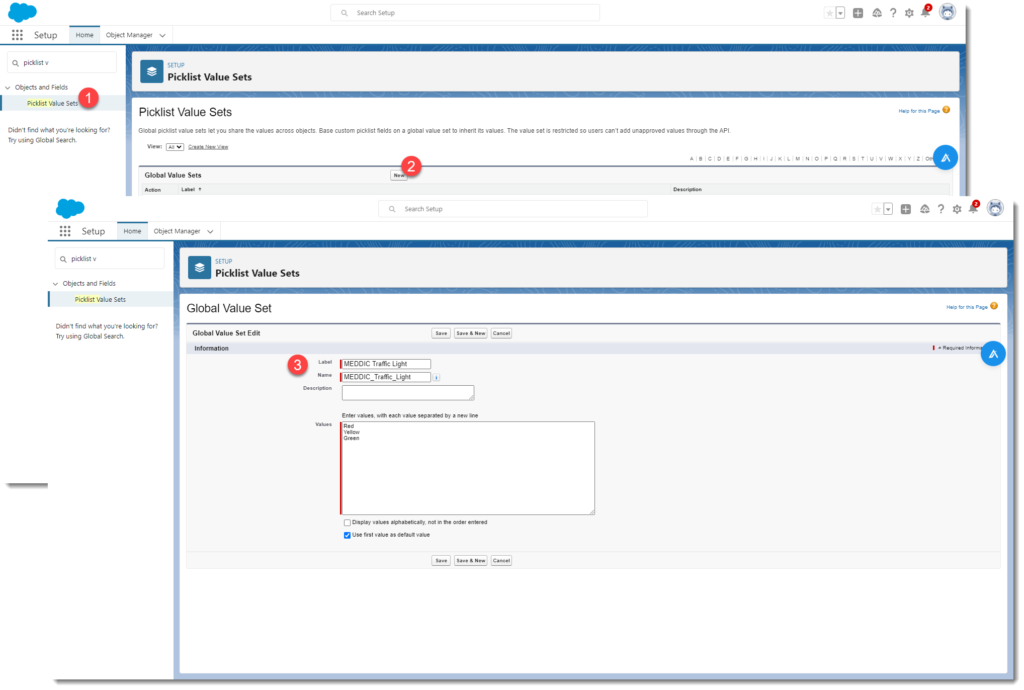
- From Setup, search for Picklist in the Quick Find box, then select Picklist Value Sets.
- Next to Global Value Sets, click New.
- Enter Label MEDDIC Traffic Light. Set Values as Red, Yellow, Green. Check the Use first value as default value as true. Click Save.
Step 5 – Create MEDDIC Traffic Light Fields
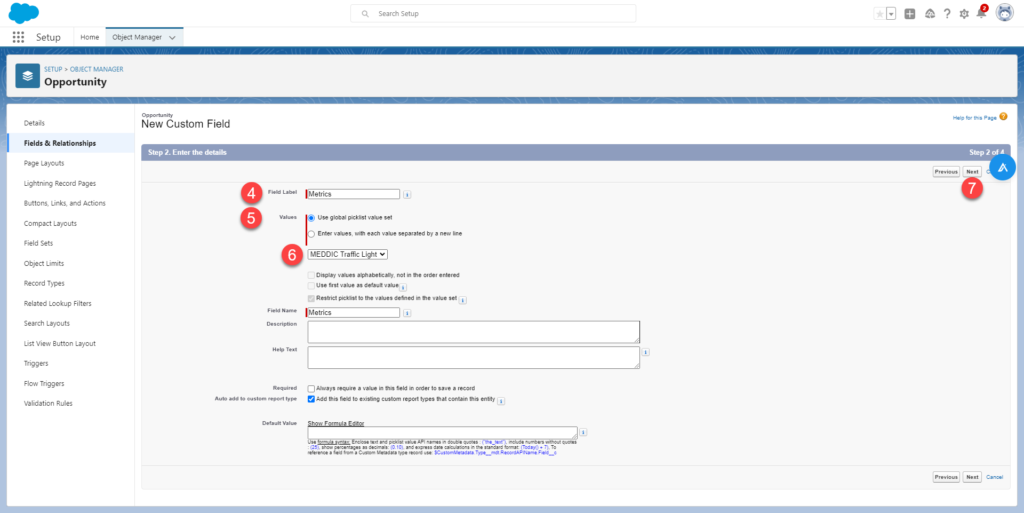
- From Setup, navigate to Object Manager > Opportunity > Fields & Relationships
- Click New
- Select Picklist > Next
- Set field label to Metrics
- Select Use global picklist value set
- Select MEDDIC Traffic Light
- Select Next and make sure field is visible to appropriate users
- Select Next and make sure field is added to the appropriate layouts
**REPEAT THIS PROCESS FOR EACH MEDDIC FIELD USING THE LIST BELOW**
- Economic Buyer
- Decision Criteria
- Decision Process
- Paper Process (optional)
- Identified Pain
- Champion
- Competition (optional)
Step 6 – Create Metrics MEDDIC Image Field
- From Setup, navigate to Object Manager > Opportunity > Fields & Relationships
- Click New
- Select Formula
- Set field label to Metrics Image
- Select Formula Return Type of Text and click Next
- Copy and paste the formula below, but replace the URL ‘https://4cast34-dev-ed–c.vf.force.com/resource/1667405379000/MEDDIC_ALL’ with the URL you saved in STEP 3 (make sure to remove the “?” at the end). –SEE VIDEO AT BOTTOM OF THIS SECTION,
- Select Next and make sure field is visible to appropriate users
- Select Next and make sure field IS NOT added on any layouts
CASE(Metrics__c,
'Red', IMAGE('https://4cast34-dev-ed--c.vf.force.com/resource/1667405379000/MEDDIC_ALL/Red_M.png', 'Red_M', 25, 25),
'Yellow', IMAGE('https://4cast34-dev-ed--c.vf.force.com/resource/1667405379000/MEDDIC_ALL/Yellow_M.png', 'Yellow_M', 25, 25),
'Green', IMAGE('https://4cast34-dev-ed--c.vf.force.com/resource/1667405379000/MEDDIC_ALL/Green_M.png', 'Green_M', 25, 25),
IMAGE('https://4cast34-dev-ed--c.vf.force.com/resource/1667405379000/MEDDIC_ALL/Red_M.png', 'Red_M', 25, 25))
Step 7 – Create All Other MEDDIC Image Fields
- Copy the final formula creates in Step 6 and paste it somewhere accessible.
- From Setup, navigate to Object Manager > Opportunity > Fields & Relationships
- Click New
- Select Formula
- Set field label to Economic Buyer Image
- Select Formula Return Type of Text and click Next
- Copy and Paste the formula from Step 6 that you just copied
- In the formula replace the Metrics__c with Economic_Buyer__c
- In the formula replace all 8 instances of “_M” with “_E”
- Select Next and make sure field is visible to appropriate users
- Select Next and make sure field IS NOT added on any layouts
**REPEAT STEP 7 FOR ALL OTHER MEDDIC FIELDS**
- Decision Criteria – Replace “M” with “Dc”
- Decision Process – Replace “M” with “Dp”
- Paper Process (optional) – Replace “M” with “P”
- Identified Pain – Replace “M” with “I”
- Champion – Replace “M” with “C” (or if using MEDDPICC – Replace “M” with “Ch)”
- Competition (optional) – Replace “M” with “Co”
Step 8 – Create MEDDIC Summary Image
- Navigate to Object Manager > Opportunity > Fields & Relationships
- Click New
- Select Formula
- Set field label to MEDDIC Summary
- Select Formula Return Type of Text and click Next
- Copy and Paste the Formula below
- Select Next andmake sure field is visible to appropriate users
- Select Next andmake sure field is added to the appropriate layouts
Metrics_Image__c & Economic_Buyer_Image__c & Decision_Criteria_Image__c & Decision_Process_Image__c & Identified_Pain_Image__c & Champion_Image__c
Step 9 (Optional) – Create MEDDIC “Notes” Fields
- Navigate to Object Manager > Opportunity > Fields & Relationships
- Click New
- Select Text Area (Long) > Next
- Set field label to Metrics Notes
- Select Next andmake sure field is visible to appropriate users
- Select Next andmake sure field is added to the appropriate layouts
**REPEAT THIS PROCESS FOR**
- Economic Buyer Notes
- Decision Criteria Notes
- Decision Process Notes
- Paper Process Notes (optional)
- Identified Pain Notes
- Champion Notes
- Competition Notes (optional)
Step 10 – Setup MEDDIC on Opportunity Layout
- Navigate to Object Manager > Opportunity > Page Layouts
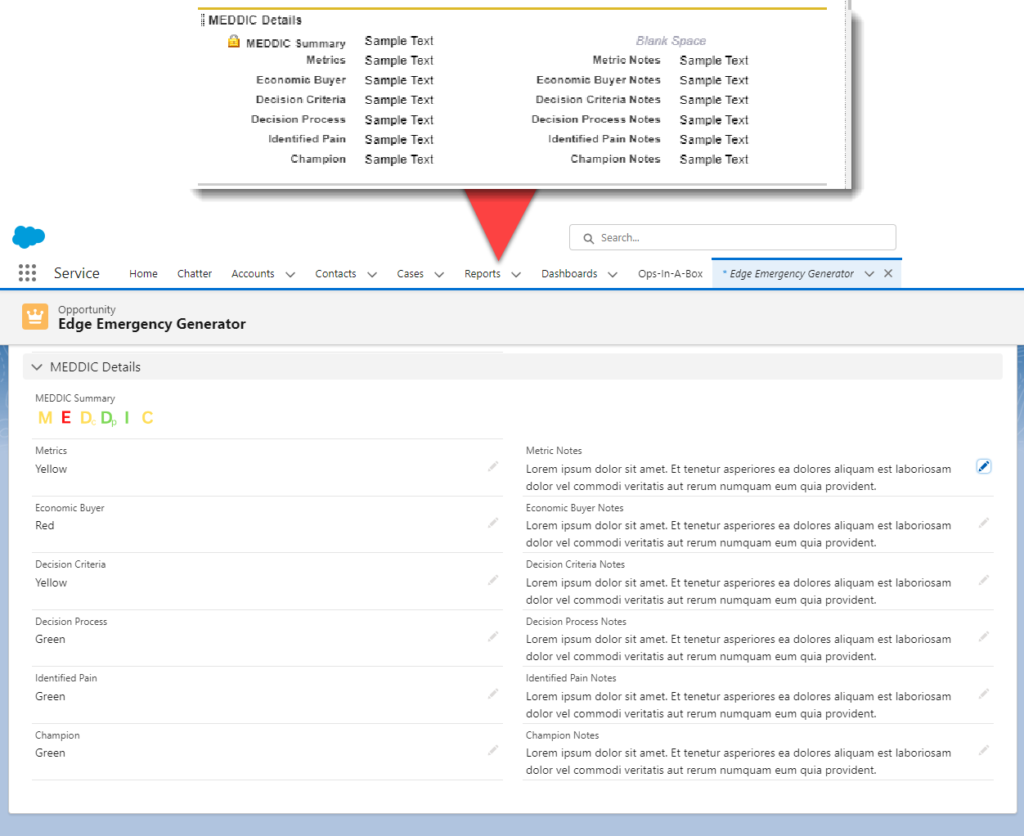
- Modify your layout as desired (follow the image below for my suggested layout)
Step 11 – Add MEDDIC Summary Image to Reports
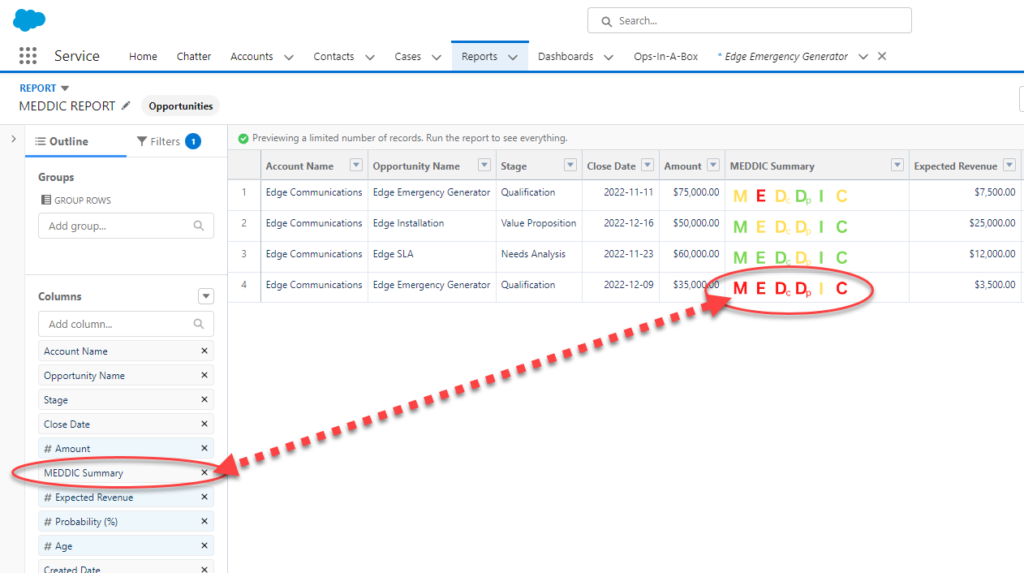
To place the MEDDIC Summary into a report, simply drag the field created in STEP 8 onto any list based report like you would any other field!
Step 12 – Training and Rollout
The “MEDDIC Traffic Light Definitions” document that you downloaded in STEP 1 should be used to provide internal training on how to set the MEDDIC dropdowns.
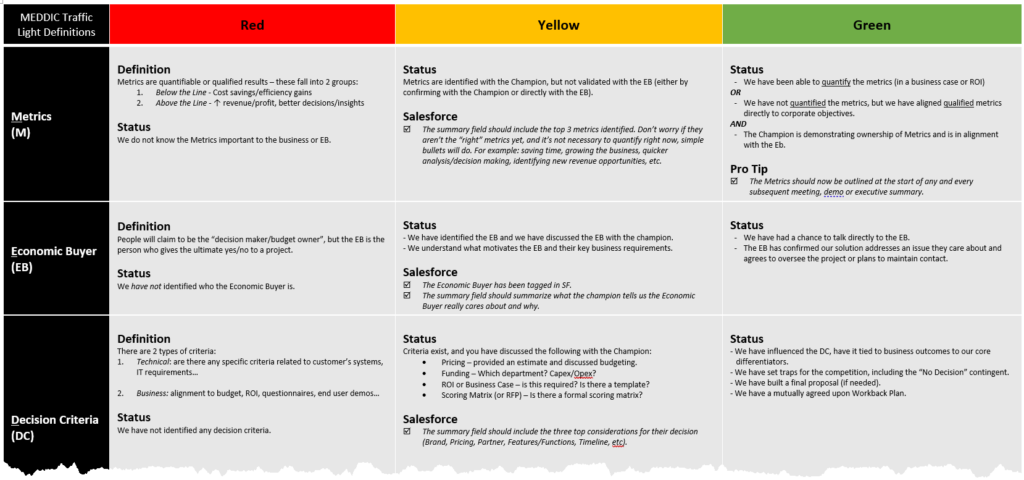
*Note that the file does not include definitions for “Competition” or “Paper Process”
That’s it!!!!
For any additional help please don’t hesitate to reach out to [email protected].
